Sizing HDPE pipes correctly helps your system work well and last. Follow these steps:
- Find the water flow rate in gallons per minute (GPM).
- Pick a flow speed between 3 to 6 feet per second. This stops the pipe from wearing out.
- Use this formula to find pipe size: (D = \sqrt{\frac{4 \times Q}{\pi \times V}}). Here, (Q) is flow rate, and (V) is speed.
- Add extra room for unexpected flow or pressure changes.
https://jiangshanpipe.com/products/pe-pipe/These steps help avoid problems like system breaks or wasted energy. Right-sized HDPE pipes keep water moving and save money over time.
Key Takeaways
- Calculate the flow rate in gallons per minute to determine pipe size.
- Choose a flow speed between 3 to 6 feet per second to prevent pipe wear.
- Use the formula to find pipe size and add extra room for changes.
- Correct pipe sizing prevents system breaks and saves energy.
- Plan for future growth to avoid costly repairs and ensure efficiency.
Why HDPE Pipe Sizing Matters
Smooth Water Flow
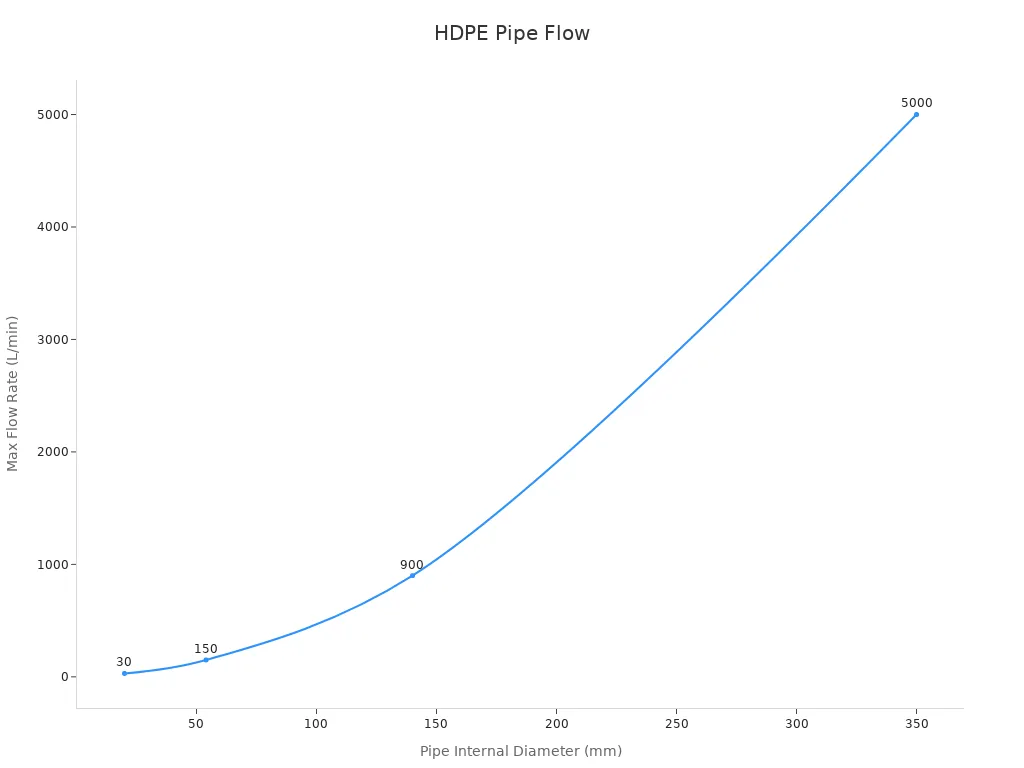
Choosing the right HDPE pipe size helps water move easily. Pipes that fit the flow rate and speed avoid energy waste. For example, a 20 mm pipe can carry 30 liters per minute. A 350 mm pipe can handle up to 5000 liters per minute.
| Pipe OD (mm) | Inside Diameter (mm) | Max Flow Rate (L/min) |
|---|---|---|
| 25 | 20 | 30 |
| 63 | 54 | 150 |
| 160 | 140 | 900 |
| 400 | 350 | 5000 |
This chart shows how bigger pipes carry more water. Larger pipes are better for systems needing high flow rates.
Avoiding System Problems
Correct pipe sizing stops problems like pressure issues or pipe damage. Small pipes can have too much pressure, while big pipes may waste energy. Studies prove larger pipes lower the chance of breaking for materials like GI, PE, CI, and DI.
| Pipe Material | Bigger Diameter Effect on Break Risk |
|---|---|
| GI | Lowers break risk |
| PE | Lowers break risk |
| CI | Lowers break risk |
| DI | Lowers break risk |
Picking the right size keeps your system strong and working well for years.
Saving Money and Energy
The right HDPE pipe size saves money and energy. Pipes that match your system need less pumping power and prevent leaks. Small pipes use more energy, while big pipes cost more to install. Proper sizing balances costs and keeps your system efficient.
Tip: Check your system’s flow and pressure often to keep pipes working well.
Factors to Think About Before Choosing HDPE Pipe Sizes
Flow Rate Needs
Knowing flow rate is key for picking pipe sizes. Flow rate shows how much water moves through a pipe in a set time. High flow systems need bigger pipes to avoid clogs. Low flow systems can use smaller pipes. Engineers use data to decide flow rate needs.
| Flow Rate Type | What It Means |
|---|---|
| 5-percent exceedance probability | High flow, happens only 5% of the time. |
| 95-percent exceedance probability | Low flow, as 95% of flows are higher than this. |
| 7-day, 2-year (7Q2) | Lowest 7-day flow that happens every 2 years. |
| 7-day, 10-year (7Q10) | Lowest 7-day flow that happens every 10 years. |
Think about peak times and seasons when figuring flow rate. This helps your system handle normal and extreme water needs without breaking.
Pressure Rules
Pressure is very important for HDPE pipe sizes. Higher pressure needs thicker pipes to stay safe and strong. HDPE pipes are rated by Dimension Ratio (DR). DR is the pipe’s outer size divided by wall thickness.
- Lower DR means thicker walls and handles more pressure.
- Pressure ratings go from 160 psi (low DR) to over 500 psi (high DR).
Heat changes pressure ratings too. For example:
- At 20°C (68°F), pipes work at full pressure.
- At 60°C (140°F), pressure ratings drop by half.
Always check the maker’s temperature guides to keep pipes safe.
Pipe Material and Thickness
The material and thickness of HDPE pipes affect how they work and last. Thicker walls handle pressure better and resist outside forces.
| Factor | Why It Matters |
|---|---|
| Wall Thickness | Keeps pipes safe and lowers failure risks. |
| Material Strength | Helps decide wall thickness and pipe durability. |
| Outside Forces | Stops pipes from bending or breaking. |
| Corrosion Resistance | Extra thickness may be needed to fight wear. |
To pick the right pipes:
- Follow rules and standards.
- Use formulas to find wall thickness.
- Add extra thickness for corrosion or tough conditions.
Good pipe sizing stops leaks, breaks, and costly fixes. It keeps water flowing smoothly and reliably.
Environmental and Operational Conditions
When choosing HDPE pipes, think about the environment and how they’ll be used. These factors affect how well the pipes work and last.
Site Conditions
The place where pipes are installed matters a lot. For example, rocky areas need thicker pipes to handle outside pressure. Flood-prone or freezing places need special materials to avoid damage.
Flow and Pressure Dynamics
Water speed and slope are key for smooth flow. Slow water can cause dirt to build up and block pipes. Fast water can wear down the inside of the pipe. The slope, or angle of the pipe, changes water pressure. A steep slope makes water move faster but lowers pressure at the end.
Soil and Temperature Considerations
The type of soil affects how pipes are placed and perform. Sandy soil might need extra support to stop pipes from moving. Temperature changes also matter. Hot weather can weaken pipes, while freezing can make them crack.
Here’s a simple table of important things to remember:
| Factor | What It Means |
|---|---|
| Site Conditions | Where the pipe is placed and its surroundings. |
| Flow Capacity | How much water the pipe can carry. |
| Hydraulic Gradient | The pipe’s slope, which affects flow and pressure. |
| Flow Velocity | How fast water moves, important for avoiding clogs or damage. |
| Structural Classification | Pipe strength to handle outside forces. |
| Wall Thickness | Thicker walls mean stronger pipes for higher pressure. |
| Pressure Ratings | The highest pressure the pipe can safely handle. |
| Soil Conditions | Soil type impacts installation and stability. |
| Temperature Variations | Heat or cold changes how strong the pipe is. |
Tip: Plan ahead and check these factors to make sure your HDPE pipes work well in their environment.
By thinking about these details, you can pick pipes that fit your system and last a long time.
Step-by-Step Guide for HDPE Pipe Sizing
Find the Flow Rate
The first step is to figure out the flow rate. This means how much water moves through the pipe in a certain time. It’s measured in gallons per minute (GPM) or liters per second (L/s). To calculate it, think about how much water your system needs. For example, homes need less water than factories.
You can use a flow meter to measure it directly. If you know the total water used and the time, divide the amount by the time. For example, if 100 gallons flow in 10 minutes, the flow rate is 10 GPM.
Tip: Plan for times when water use is highest. This helps avoid clogs or pressure problems.
Check Pressure Needs
Pressure is very important when picking the right pipe size. Pipes must handle pressure without breaking or bending. Start by finding out your system’s working pressure. This includes pressure when water is still (static) and when it’s moving (dynamic).
Here are some things that affect pressure:
- Inside pressure changes the pipe’s design and material.
- Maximum pressure depends on temperature, pipe size, and rating.
- Sudden pressure spikes, like water hammers, can go over limits. Use surge tanks or valves to control these.
- Hydrostatic tests check pipe strength. These tests use 1.5 times the normal pressure.
For example, if your system runs at 100 psi, the pipe should handle 150 psi during testing. Always check the maker’s pressure ratings and adjust for heat.
Note: Hot temperatures lower pressure strength. At 140°F, the pipe’s pressure rating may drop by half compared to 68°F.
Measure Pipe Size (OD, ID, and Wall Thickness)
After finding the flow rate and pressure, measure the pipe size. This includes the outside diameter (OD), inside diameter (ID), and wall thickness. These measurements affect how strong and durable the pipe is.
Here’s how to measure:
- Use a ruler or tape to measure the inside diameter. Place it across the pipe’s opening and note the distance between the inner walls.
- Measure the outside diameter by wrapping the tool around the pipe’s outer edges. This gives the total width, including the walls.
Wall thickness is the difference between the OD and ID, divided by two. For example, if the OD is 100 mm and the ID is 90 mm, the wall thickness is ( \frac{100 – 90}{2} = 5 , \text{mm} ).
Tip: Thicker walls can handle more pressure but reduce space for water. Balance thickness with your system’s needs.
Use charts or formulas to double-check your measurements. These tools help match pipe size to your system. For example, a chart might show a pipe with a 160 mm OD and 140 mm ID can carry 900 liters per minute.
Reminder: Always check your results with real-world conditions. This ensures the pipe works well in your system.
Use Sizing Charts or Hydraulic Formulas
Sizing charts and hydraulic formulas make picking the right pipe size easier. These tools give accurate sizes based on flow, pressure, and material. Using them helps your system work well without extra changes.
How to Use Sizing Charts
Sizing charts are tables that match flow and pressure to pipe sizes. To use one:
- Find your system’s flow rate on the chart.
- Look for the matching pressure rating.
- See the pipe size suggested for those values.
For example, if your system needs 50 GPM and 100 psi, the chart might recommend a 2-inch pipe.
Tip: Check the chart’s units. Some use liters per second (L/s) instead of GPM.
Applying Hydraulic Formulas
Hydraulic formulas calculate pipe size using flow speed and material. A common formula is the Hazen-Williams equation:
[ V = k \cdot C \cdot R^{0.63} \cdot S^{0.54} ]
Where:
- (V) = Water speed (ft/s)
- (k) = Conversion factor (1.318 for U.S. units)
- (C) = Roughness number (e.g., 150 for HDPE)
- (R) = Hydraulic radius (ft)
- (S) = Slope of energy line
Rearrange the formula to find the pipe diameter. This method takes more time but gives exact results for your system.
Note: Use formulas for special systems or when charts don’t fit your needs.
Verify Results Against System Needs
After choosing a pipe size, check if it fits your system. This ensures the pipe works well in real conditions.
Steps to Verify Pipe Sizing
- Check Flow Capacity: Make sure the pipe handles the highest flow without issues.
- Confirm Pressure Ratings: Ensure the pipe’s pressure rating meets or exceeds your system’s pressure.
- Evaluate Material Compatibility: Check if the pipe material works with your system’s environment.
- Account for Future Expansion: Think about future flow or pressure increases.
Example Verification Process
Say your system needs 80 GPM and runs at 120 psi. You pick a 3-inch HDPE pipe. To verify:
- Check the chart to confirm it supports 80 GPM.
- Make sure the pressure rating is at least 120 psi.
- Review the maker’s guide to ensure the pipe suits your system’s temperature and conditions.
Reminder: Inspect your system often to ensure pipes stay in good shape.
By following these steps, you can pick and confirm the best pipe size for your water system.
Common Mistakes in HDPE Pipe Sizing
Forgetting About Flow Rate Changes
Not thinking about flow rate changes can cause big problems. Pipes that are too small might not handle high water flow. This can lead to clogs or sudden pressure increases. Pipes that are too big can slow water down. Slow water can cause dirt to collect and make the system less efficient.
To fix this, think about both normal and high flow rates. For example, homes may have steady water use but higher use in the morning or evening. By planning for these changes, you can pick a pipe size that works well all the time.
Tip: Use tools like flow meters or past data to see flow patterns. This helps you choose the right pipe size for both regular and busy times.
Ignoring Pressure Drop
Skipping pressure drop checks can hurt your system’s performance. Water moving through pipes rubs against the walls, lowering pressure. If you don’t plan for this, your system might need more energy to work, costing more money.
Here’s what happens if you ignore pressure drop:
- Energy Waste: Friction turns water energy into heat, wasting power.
- Lower Efficiency: Bigger pressure drops mean more energy is needed to move water.
- System Damage: Too much pressure loss can harm pumps and shorten their life.
To avoid these problems, calculate pressure drop when designing your system. Use tools like the Hazen-Williams formula or charts to estimate pressure loss based on pipe size, material, and flow rate.
Note: Check your system often for signs of pressure loss, like slower water flow or higher energy bills. Fixing these issues early saves money and keeps your system running longer.
Picking the Wrong SDR or Wall Thickness
Choosing the wrong SDR or wall thickness can cause pipes to fail. SDR is the ratio of a pipe’s outer size to its wall thickness. A lower SDR means thicker walls that can handle more pressure.
Here’s a simple guide for SDR values:
| SDR Value | Best Use | Pressure Strength |
|---|---|---|
| SDR 11 | Factories and heavy-duty uses | Handles high pressure |
| SDR 17 | Water and sewer systems | Works for medium pressure |
| SDR 26 | Drains and low-pressure systems | Handles light pressure |
Picking the right SDR makes sure your pipe can handle the pressure it will face. For example, SDR 11 is great for high-pressure systems, while SDR 26 is better for drains.
Wall thickness also matters for pipe safety and strength. Thin walls might leak or burst under high pressure. Think about pressure, temperature, and pipe size when deciding thickness.
Tip: Follow manufacturer advice and industry rules when choosing SDR and thickness. This keeps your system safe and working well.
Thinking Ahead for Future Growth
Planning for future growth is key when designing HDPE pipe systems. Skipping this step can cause expensive fixes, poor performance, or system breakdowns. Pipes should meet today’s needs and handle future increases in water flow or pressure.
Why Planning for Growth Is Important
Water systems often need to handle more demand over time. More people, new buildings, or growing industries can increase water use. If pipes are too small, they may need replacing later. This can disrupt services and cost a lot of money.
For example, cities like San Diego and Prichard, Alabama, have had big problems from poor planning. The table below shows what happens when future needs are ignored:
| City | Problem Description | Cost |
|---|---|---|
| San Diego | Stormwater system failure caused flooding; backlog of $2 billion. | $2 billion |
| Prichard, Alabama | Old water pipes caused leaks and flooding. | Over $400 million |
Tip: Plan for long-term growth when choosing pipe sizes. This saves money and avoids problems later.
Steps to Prepare for Growth
You can avoid these issues by building systems that can grow. Follow these steps to plan for future needs:
- Predict Future Water Use
Look at population growth or industry data to estimate future water needs. For example, if a town’s population will double in 20 years, pipes should handle twice the current flow. - Pick Bigger Pipe Sizes
Choose pipes that can carry more water without losing pressure. Larger pipes cost more upfront but save money by avoiding replacements later. - Add Extra Capacity
Design systems with backup pipes or extra space. This helps handle sudden increases in water use or emergencies. - Use Stronger Materials
Select HDPE pipes with thicker walls or higher pressure ratings. These pipes can handle more water and pressure as needs grow.
The Price of Poor Planning
Not planning for growth can lead to costly repairs and upgrades. Replacing small pipes often means digging up roads, stopping traffic, and cutting off water. These projects can cost millions, as shown in the table above. Planning ahead avoids these problems and keeps systems running well.
Reminder: Check your system often and update plans as needs change. This keeps pipes working efficiently for years.
By thinking about future growth during design, you can create a water system that adapts over time. This saves money, prevents failures, and ensures smooth operation for the long term.
Choosing the right HDPE pipe size helps your water system work well and last longer. Use these steps to find the flow rate, check pressure, and pick the right pipe size. Doing this has many advantages:
- Keeps water flowing smoothly and avoids big pressure drops.
- Stops leaks and breaks, so less fixing is needed.
- Makes pipes stronger to handle tough conditions.
- Saves money by using materials wisely and cutting future costs.
Follow these tips and ask experts if unsure. This way, you can build a strong and affordable water system.
FAQ
What does SDR mean in HDPE pipes?
SDR stands for Standard Dimension Ratio. It compares a pipe’s outer diameter to its wall thickness. Pipes with lower SDR have thicker walls and can handle more pressure. For instance, SDR 11 pipes are stronger than SDR 17 pipes.
How do I calculate the flow rate for my system?
To find flow rate, divide the water amount by the time it flows. For example, if 100 gallons pass through in 10 minutes, the flow rate is 10 gallons per minute (GPM). Use a flow meter for exact results.
Can HDPE pipes handle high temperatures?
HDPE pipes work well up to 140°F (60°C). But higher temperatures lower their pressure strength. Always check the maker’s temperature rules to keep your system safe.
Why is wall thickness important for HDPE pipes?
Wall thickness shows how strong a pipe is. Thicker walls handle more pressure and stop leaks or breaks. For example, thick-walled pipes are best for high-pressure systems or places with heavy soil.
How do I choose the right pipe size for future expansion?
Plan ahead by guessing future water needs. Pick pipes with bigger diameters or higher pressure ratings to handle growth. For example, if your system might double, choose pipes that can carry twice the water.
Tip: Ask an engineer for help with sizing and future planning.